3D-VR Information by Dan T

Name:
Location: Brighton, Massachusetts, United States

Friday, September 30, 2005

Class Three Homework

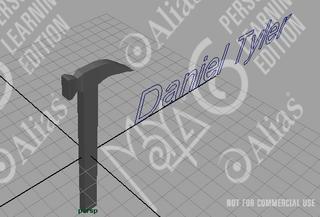
I have been working on finishing the hammer we started in our second class. By the end of the second class the hammer was basically finished except for one set, to smooth out the edges and make it a bit less blocky. I decided to smooth the entire hammer at once instead of a piece at a time, it just seemed simpler that way. Immediately after using the Smooth option in Maya I found I still had some more work to do. The handle of my hammer became more dagger-like with quite the sharp point at the end. Also the head was more rounded than I would like. To resolve both of these problems I had to move individual vertices manually until I was left with a shape more resembling a hammer than some other exotic tool. Below is a picture of my finished hammer object.

Along with the hammer, we started to work with NURBS last class. Specifically we started to create a head, starting with a spherical body. Working with this object was almost exactly as Instructor Dan described it, using modeling clay to shape the object. With this procedure I felt as if I had a little less control over how the object was altered, but I could not see doing this project with normal polygons as there would be far too many vertices to work with in such a setup. Either way I followed the Maya tutorial instructions to create my "egghead" character below.


Now that we are done with the tutorials it was time to create our very first individual object. The requirements for this object is that it could be found in colonial days around the time of the revolutionary war. I considered objects such as a hammer or lantern, but in the end settled on something a little more challenging (perhaps too challenging). Since our final project will entail objects that may be found on a sailing vessel of the time, I felt a cannon may be a good object to work on. However I do not yet feel confident enough to create a full cannon, so I worked on only the muzzle portion. I must have restarted the project a dozen times at least. Each time I wanted to either change the initial polygon, give the polygon more vertices/faces or try to smooth the object at different times during the object's creation. I finally settled on using cubes to setup the initial structure of the cannon and then smoothed the entire object at once. This left the ridges on the object a bit blocky and pointed. As a result I spent quite a bit of time rearranging individual vertices to try and smooth out the rough patches. While the object is not really yet done, it is a step in the right direction.


Later I intend to create the bottom part of the cannon that will hold the muzzle as a separate object. Then as my final step combine the two Maya objects into one working ship's cannon.

While working on this a question did come up. The ridges in the middle were a bit cumbersome to work with since they started life as cubes. I was curious about the possibility of deleting those parts and replacing them with cylinders or some procedure similar to this with the same end result. I posted my question on the 3DBuzz forums under Maya Modeling. This thread can be found here. Hopefully the answer I get will let me fine tune the current cannon muzzle I am working on.

Tuesday, September 27, 2005

Learning to create images in Maya


Over the past two classes we have learned some of the ins and outs of the Maya Personal Learning Edition program. Specifically we have roughly followed a few of the tutorials to create common items that can be found anywhere. However, even though the items are simple, creating them was not. Our first challenge was to create a hammer. This sounds easy enough as there are not any odd shapes or outrageous curves in a hammer that might give a novice such as myself difficulty. Apparently I spoke too soon. It took us a good portion of our class to work on the rough outline of the hammer, as seen to the right. We learned to extrude faces, alter vertices and maneuver the object for the best vantage point. The hardest part of creating this image was the back end, the curve of the hammer. Curving a straight piece is no easy task and required a few attempts before it somewhat resembled a hammer piece. I have found the most frustrating thing so far is my inability to edit the object at a point earlier in its construction. By this I mean that if I wish to go back a few steps to correct a minor mistake it is extremely hard to alter what is necessary. Instead I have found myself undoing all the steps leading back to the mistake in question. Then the mistake is corrected and all of the steps that were undone must now be performed again. In creating an object it appears that the author must know exactly what the object will look like before even starting, as this will limit the amount of step repeats that I encountered when creating the hammer object.

Along with creating a hammer we also worked on creating symmetrical objects, such as a cup. To the left is the cup that was created in class this past Sunday. This cup was created in a different method than that of the hammer. While the hammer was created one block at a time, the cup was created one point at a time. By this I mean that we created a set of points on the grid that corresponded to what half of the cup would look like as a cross-section. These points were automatically connected together by the Maya program and when we revolved the cross-section they created the solid object you see to the left. This image could then be fine-tuned to resemble a cup as much as possible by moving the individual points in order to round out the edges and give the object more realism. This feature of revolving a set of points is extremely helpful in creating symmetrical objects, but is very limited in when it can be used. Objects such as cups, bowls, plates, candlesticks and the like are the only such objects that can be created in this manner. Anything with an irregular shape, such as a clock or piece of furniture would have to be created in the same manner as the hammer.

Sunday, September 18, 2005

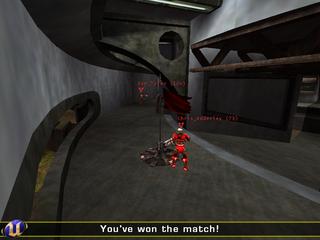
Unreal Tournament 2004 screenshot


This is a screenshot of our Saturday morning game. That is me in the background and one of my classmates in front.

Homework One

This week I had three assignments; install Unreal Tournament 2004 to my computer, download and install Maya to my computer and join with my classmates in an Unreal Tournament game on Saturday morning.

Finding the Unreal Tournament 2004 game was not very difficulty, I was even able to locate the Editor's Choice Edition which was the recommended set to purchase. Installing it however proved to be more of a challenge that anticipated. It had slipped my mind that my computer does not have a DVD drive in which to read the CDs, since the Editor's Choice Edition is DVD. I therefore had to purchase a DVD drive and install it to the open bay of my computer before Unreal Tournament 2004 could be installed. However once the computer accepted the CDs installation was extremely simple and uneventful.

The Maya software was easy to install by comparison. It only took a few minutes to download the 150 MB file from the internet and perhaps 2 minutes to install the software. Everything went as planned and the software runs as expected, that is until I start actually using it but I'm keeping my fingers crossed on that one.

The last part of our homework was to join together on Saturday morning and play a game or two of Unreal Tournament 2004. This ended up being a problem as our game server was corrupted and it took about a hour to set up a new one where we could meet. However once that was accomplished we were able to play a few games of "Capture the Flag" successfully. Unreal Tournament is not my normal type of game, when I decide to play. So as a result I was rather well demolished by my classmates. While my abilities are not very good, I was able to view the game scenery itself during the moments I was not being chased by my classmates. It is rather well done and very realistic. I was able to take a screenshot of the game that displays me and another of my classmates immediately after we won a round of Capture the Flag. I will post that picture in my blog.